Eric Whitehead, author
Dr. Robert Marmorstein, faculty advisor
awarded first place for best natural science and mathematics paper
Introduction
At the beginning of the year, the frame of arcade cabinet had already been mostly built. The remaining ‘physical’ work involved installing the door on the front of the cabinet, setting up the I-PAC and grounding block, mounting the keyboard, installing more buttons, and fixing some of the wiring.
Implementation
As opposed to purchasing dedicated hardware specifically designed for use in an arcade machine, we chose to reuse an old system which was available. The system is not the bleeding-edge of power and performance, but it is sufficient for the job. It has a 32-bit Intel Pentium 4 processor running at 3.00 GHz with 2 GiB of memory. It also has an Intel 82945G/GZ Integrated Graphics Controller.
We decided to install both educational games and entertainment games including GCompris, Child’s Play, The Battle for Wesnoth, and a number of classic arcade games.
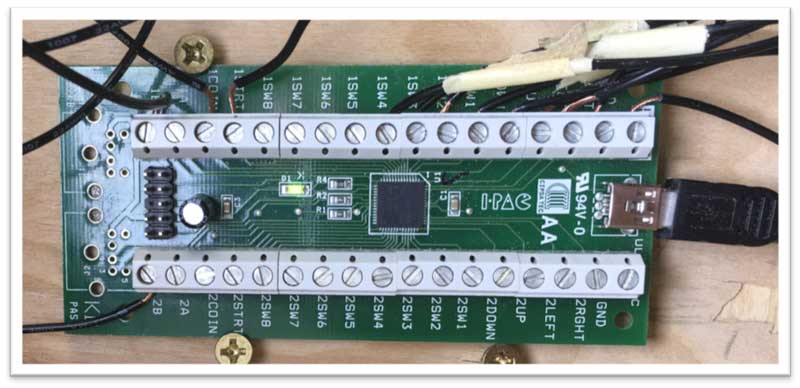
Some of these games work best with a keyboard and mouse, others work best with a joystick and buttons. As a result, it was necessary to include both with the arcade machine. We purchased a keyboard and trackball specifically designed to be used in a kiosk environment, so it will hopefully stand up well to the abuse it will inevitably endure. Instead of purchasing a conventional joystick with built in buttons, we decided to purchase a standalone joystick and buttons. This necessitated the installation of a device called an I-PAC or Programmable Automation Controller.
 Figure 1. An I–PAC, or Programmable Automation Controller.
The I-PAC makes it possible to use a joystick and several different configurations of buttons. This allows us the flexibility to add more buttons later as they become necessary. We installed six buttons and one joystick. Four buttons are for in-game actions and the other two are for arcade actions.
We also added fans for ventilation so that the hardware does not overheat and made the cabinet more portable by adding an ethernet port to the back of the cabinet. The Ethernet port eliminates the need to run a cable into the cabinet in order to connect it. We also added a female C14 outlet harvested from an old power supply to provide a similar solution for the power cable.
With all of the major hardware setup and configuration completed, the next step was to work on the software. Although there are many different Linux distributions to choose from, we ultimately chose Ubuntu 12.04 LTS for three reasons: it is still supported, it is relatively easy to configure for use in a kiosk environment, and it is what happened to be easily available.
Ubuntu is well-suited for this project because it a common distribution which means it directly supports a lot of the things we needed. Ubuntu uses its own display manager called LightDM. A display manager works by starting the X Server, user session and greeter. A user session consists of a desktop environment that provides access to the programs of an operating system. It is launched by the login screen and used to launch other applications. In Ubuntu, the default session is the “Unity Desktop.” We modified this behaviour by changing the desktop file LightDM uses.
 Figure 2. We modified this behavior by changing the desktop file LightDM uses.
We created a file named gcompris.desktop in “/usr/share/xsessions” which tells LightDM to execute a custom desktop session when a particular user logs in. The line “Exec=game_choice” tells LightDM to run “game_choice“ at login and the line “Name=gcompris“ is how LightDM knows which file to use.
In “/etc/lightdm” we modified the file “lightdm.conf” (which is the configuration file for LightDM) and created the “restart” file.
 Figure 3. In “/etc/lightdm”, we modified the file “lightdm.conf” (which is the configuration file for LightDM) and created the “restart” file.
The three important lines in “lightdm.conf” are “user-session=gcompris” which tells LightDM to use the gcompris.desktop file which we created earlier, “autologin-user=gcompris” which tells LightDM to automatically login the account “gcompris”, and “session-cleanup-script=/etc/lightdm/restart” which tells LightDM what to do after the user logs out.
In this case, upon logout, LightDM executes the “restart” script which restarts the LightDM service. It was necessary for us to do this because, although it is possible to configure LightDM to bypass the login window (the greeter) and automatically log in, we were not able to find a way to configure LightDM to automatically log back into the account after it had been logged out, it would simply return to the login screen, which, for security purposes, we do not want. We dealt with this by forcing the LightDM service to restart after logout which causes it to automatically log back into the “gcompris” user account, bypassing the login screen.
As we mentioned earlier, Ubuntu usually starts the “Unity” desktop environment when a user logs in. In “/usr/local/bin” you will find the “game_choice“ script we created which allows the player to choose the game they want to play.
 Figure 4. In “/usr/local/bin” you will find the “game_choice“ script we created, which allows the player to choose the game they want to play.
The script itself is generated by another script called “generate_menu” which reads the file “games.csv” and generates the “game_choice“ script.
We used KDialog to create the menu that the player initially sees.

Figure 5. We used KDialog to create the menu that the player initially sees.
On the line ‘choice=$(kdialog –menu “Choose a Game:” 1 “GCompris” … –title “Play” –geometry 1024×760+0+0);’ we specify which games should be in the list using key-value pairs, where the key is a number and the value is the name of the game as it will be displayed in the menu. From there, we use else if statements which correspond to the key numbers to launch the individual games. We also used this script to incorporate logging functionality to keep track of which games were played and for how long.
Although it would be much easier to simply press a button or flip a switch on the arcade machine to put it into some sort of configuration mode, we decided that, ultimately, it was better if there was no such mode accessible from the arcade machine’s primary interface. This will prevent players from deliberately or unintentionally breaking the system. Instead, we decided to allow administrative access only using ssh over a network connection.
 Figure 6. This will prevent players from deliberately or unintentionally breaking the system.
We installed a wireless router in the cabinet which broadcasts the “Arcade Cabinet” network. The router is configured WPA2-PSK encryption and a strong key. It is configured to give woz a static IP address of “192.168.1.2” for easier access. Lastly, in the event that the cabinet is connected to the Internet, it is configured to forward port 22 to woz and has a dynamic hostname.
Once connected to a network, woz can be accessed via ssh in the same manner as any other system.
While it is technically possible to do just about everything you would need to do using the command line, some tasks are easier to do using a graphical interface. To provide this interface, we use a VNC server and SSH port tunneling. This allows us to forward the VNC port (port 5901) to the client.
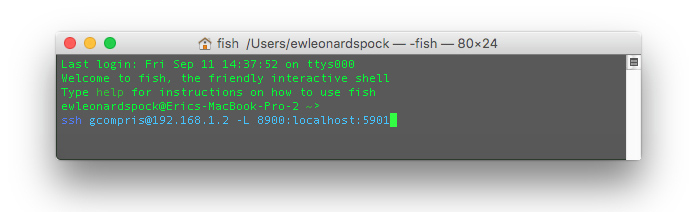 Figure 7. This allows us to forward the VNC port (port 591) to the clients.
Conclusion
The cabinet is now almost ready for use. It needs to be painted and needs glass for the front panel. In the future, we would like to add more games to the collection. We also plan to collaborate with students and faculty in other departments to use it as a platform for cross-disciplinary research in areas such as human-computer interaction, marketing, and the psychology of education.